Step by Step guide for direct calling without pbx to Mobotix camera
This is meant to help those who want to call a mobotix camera with a video phone without a PBX. This guide has screen shots of the web interface of a Mobotix M12 camera and A Grandstream GXV3140.
Before you start:
Check that both the camera and phone are in the same subnet.
Set static addresses for each device.
Step 1: Log in
Using the IP address of the phone log into the web interface, this can be done by locating the address on the main screen of the Grandstream and through the Mobotix control center program. Plug these addresses into a web browser (Internet Explorer or Firefox). The default user name for the Grandstream phone is admin with a password of admin. The mobotix camera has a default username of admin with a password of meinsm.
Step 2: Configure Camera
Admin Menu ->VoIP settings
Setup mode= expert
VoIP = enabled
Hangup on outgoing call = disable
User Name = an extension number of your choice (example: 728)
SIP domain = IP address of the camera
Registrar = blank (only needed if a PBX is used)
SIP ID = match the username field
SIP password = blank
Use outbound proxy = Disabled
SIP port = 5060
Audio RTP port= 7078
Video RTP port = 9078
Video= enabled
Video size = QCIF
Video bit rate= 150kbit/s
Rest of the setting should be default.
When you are done changing the values hit the set button to apply the changes and then hit the close button to save the changes to the cameras memory.
Admin menu -> Phone profiles
Phone number or SIP address = the extension number that was added in the “Username” field in the last section. The extension is followed by @ and the IP address of the phone. (example: 728@10.10.10.108)
Connection type = SIP Video
Message name = default
Confirm call with PIN code is for security. My suggestion is to leave it blank while testing and when placed into production than I would apply it.
After the message has been sent = intercom
Hangup after = never
Rest of the settings in this section can be left as default.
When you are done changing the values hit the set button to apply the changes and then hit the close button to save the changes to the cameras memory.
Admin menu -> Phone Call-In
Phone call in = VoIP only
Accepted phone numbers or sip addresses = allows you to control what phones are able to call the camera this is for security reasons. I suggest leaving blank for initial testing. When you put this system into production I would fill it out. Once you configure the phone and make a successful test call you will be able to go back to this section and click a button that will auto fill the field and set the camera to deny any other calls to the camera.
Audio mode = intercom.
The other setting should be left as default.
When you are done changing the values hit the set button to apply the changes and then hit the close button to save the changes to the cameras memory.
Admin menu -> store
This will store the changes you have made on the Mobotix camera and reset the camera so the changes can take place.
Step 3: Configure the Phone
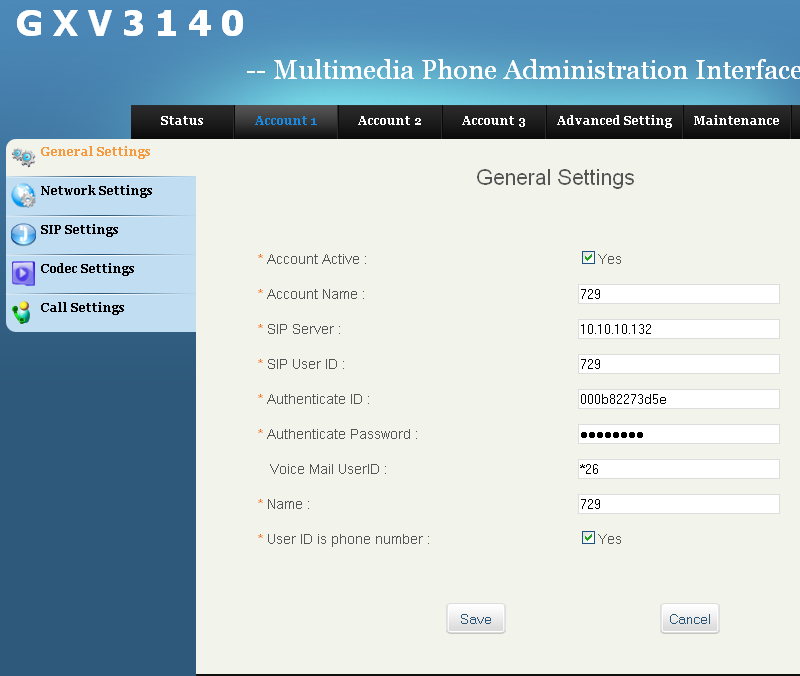
Select one of the account tabs
Account name = three digit extension that doesn’t match the extension you gave camera
SIP server = IP address for camera
SIP user ID = three digit extension that doesn’t match the extension you gave camera
Authenticate ID = bank this field will populate when the phone is rebooted but it doesn’t matter. The same goes for the
Authenticate password these felids are only needed if you have a sip server.
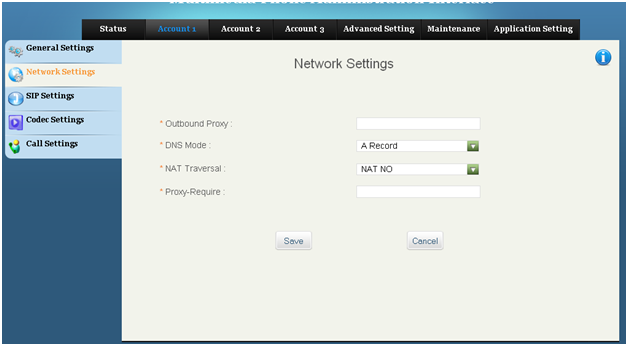
Save the settings with the save button before click on the network settings tab.

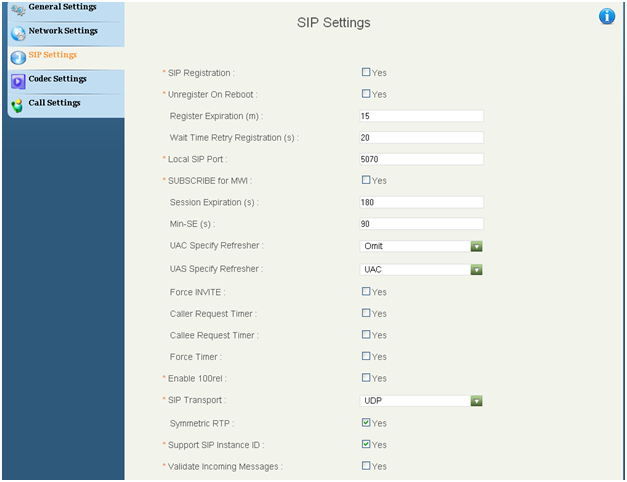
These settings are default for the phone. They depend on the infrastructure of your network.

SIP registration = unchecked
Rest of the settings should be default.

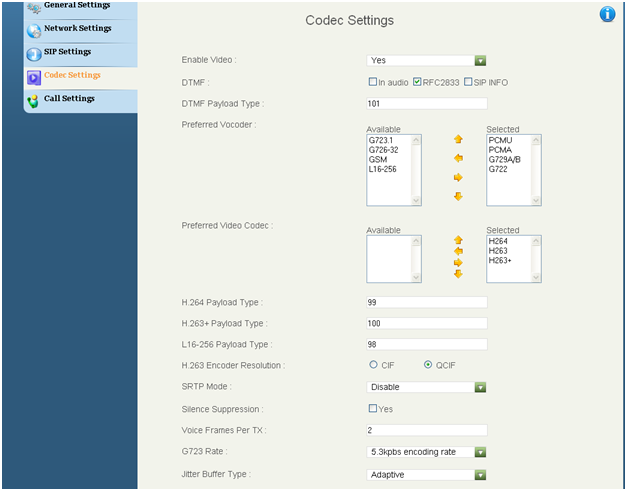
Enable video = yes
Add the video codec for H.263 and 264 to the selected box to the right as shown in the screen shot.
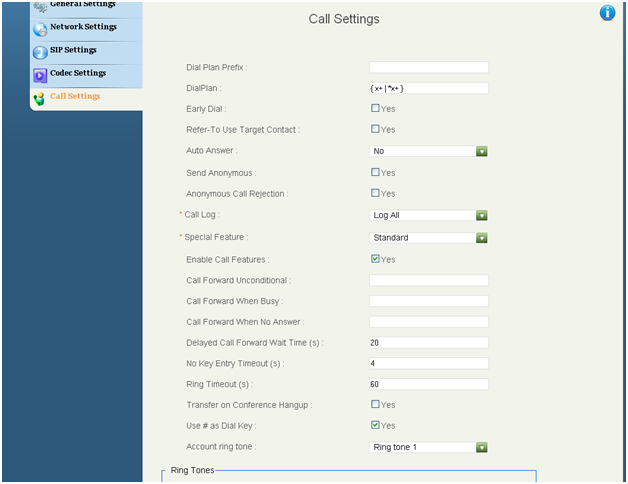
Set the other parameters in the screen shot to match.

Dial plan = {x+|*x+}
The other settings should be default.
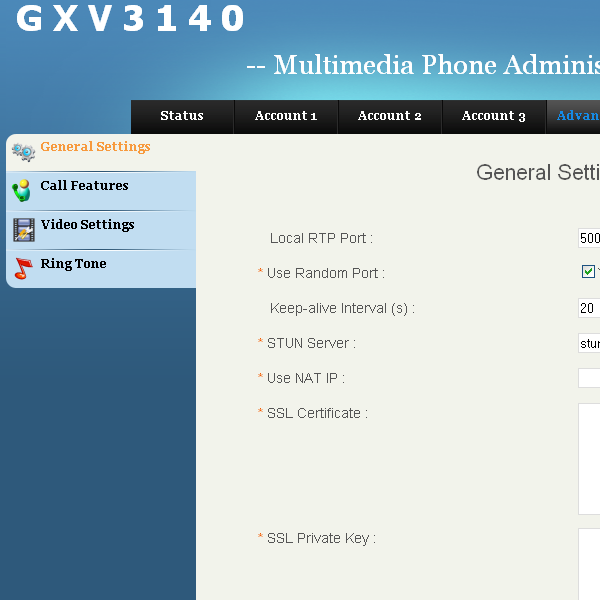
Under the advanced settings tab make sure use random port is unchecked.
This post is the basic parameters that need to be configured in order to configure call in. Playing around with the optional parameters is a good way to learn what they do and in some cases the syntax needed to get options to work. If you find yourself overwhelmed ABP can help. Here is a link to the our support page http://www.abptech.com/support/. Good luck to any one using this guide and I hope it helps.
Eric Latimer


